Brake pads should always work best, and it’s essential to ensure they are still in the best working conditions. Eventually, with passing months, it’s time to replace brake pads to save your money in the long run.
Have you started to experience minor symptoms of brake pads?
Let’s find out if they’re getting towards their end of life, making diagnosis and repairs easy. The perfect brake pads can protect you and your vehicle from an unforeseen accident. But you must be wondering how to know when to replace brake pads.
So, let’s dive in to find out when, how, and why to replace the brake pads.
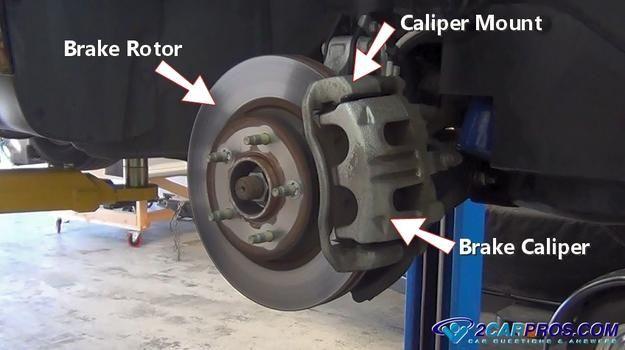
Car Brake Pads Wear and Tear:
If the brake pads are not working correctly, other parts of the car, like rotors, brake plates, discs, or calipers, might also wear off. It’s essential to maintain working brake pads at all times to avoid expensive repairs and dangerous driving conditions.
Now and then, when you drive, you are using your car’s brake, which can lead to minute wear and tear over the brake pads. Whatever brake pad type your vehicle has, including organic, ceramic or metallic, there is a certain amount of friction that leads to pads wear and tear along with the coating. With the passing time, the brake pad turns thinner to the point where you need to replace it. So, what are the signs you should seek when replacing brake pads?
When to Replace Brake Pads?
Check out the following signs when you need to replace brake pads.
Screeching Noise:
It is one of the most common indications to identify that the brake pads are not working correctly. You start noticing the squealing, screeching noise. This sound occurs because of the metallic, small shim indicator embedded in the brake pad to give you the sign. When you keep listening to it regularly, it’s high time that you should consider taking your car to a brake specialist.
Whenever you drive your car in damp, wet conditions, especially after rain, storms, hail, a thin dust layer might accumulate around the brake pads leading to the screeching noise. If this sound disappears after some time, then your brake pads are in good condition; if it stays, you need a replacement.
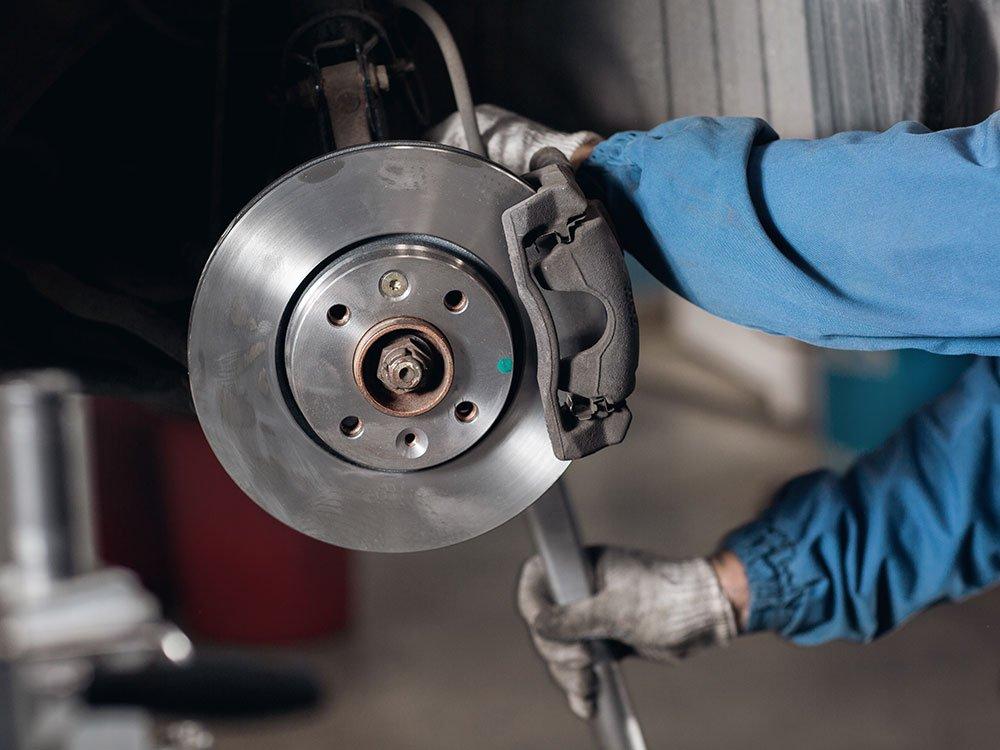
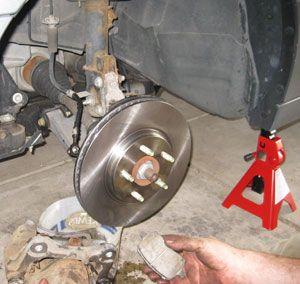
A Pint of Quart Inch Of The Brake Pads:
Inspect your brake pads timely to identify whether they need a replacement. Look through the tire spokes and check whether the brake pad is compressed over the brake rotor. If the brake pad is less than 3 millimeters or ¼ inch thick, consider inspecting the brakes.
Deep Metallic Growling and Grinding Sound:
If you start hearing low, deep noises like a metal rumbling sound, it’s the sign your brake pads are worn along with contact between the calipers and brake discs. This metal-to-metal contact can lead to further damage to the brake system. It’s essential to immediately take the car to the service shop as further delay can cost you much.
Vibration:
Suppose you seek vibration in your brakes while driving the car. It’s the sign your car’s brake system needs some professional help. There are high chances that the rotors are deformed with uneven wear and tear of the brake pads.
Not Working Efficiently:
If the brake pads are taking longer than usual to stop, you need to check them to ensure they have lost performance. It indicates the brake pads have worn out completely, or it might suggest the brake fluid is either leaking or is low. To get the complete insight into what’s happening with the brakes, you need to get your car to the brake mechanic auto repair immediately to ensure the brakes are working correctly.
Indicator Lights:
Some cars come with an indicator light present on the dashboard, which signals the users when it’s the right time to replace the brake pads. One brake light is the antilock braking system light, while the other one is the brake system warning light.
The brake pad indicator light also comes up when you engage the parking brake. But if you still see this indicator light on without engaging the parking brake, there are high chances your brake is suffering from an issue.
I hope this entire section, along with the video, helps you to have a complete insight on why, when, and how to replace the brake pads.
What Thickness Do Brake Pads Need To Be Replaced?
Brake pads are one of the essential components of the braking system in all vehicles. Maintaining them in their working condition is crucial to ensure the safety of both the passengers and the driver. On average, the pads should be replaced after every 40000-50000 miles. However, this number varies based on your driving style, type of vehicle, and road conditions.
For instance, if you drive in an urban area with heavy traffic, you’ll use your brakes more frequently than the person driving on highways or in rural locations.
Some people frequently ride the brake pads, meaning they are habitual to press or depress the brakes more often, leading to quick brake pads wear and tear.
A straightforward way to identify whether the brake pads have undergone wear and tear is to inspect between the wheel spokes and check out the brake pad. If the brake pads are less than ¼ inch thickness, then it’s time to replace them with new brake pads.
So, what are you waiting for? Watch the video tutorial to get the complete know-how of when to replace the brake pads and the signs.
How Long Will 3mm Brake Pads Last?
It all depends on the brake pad lining material, driving habits, speeding, miles-driven, and last-second braking. It all affects how long your 3mm brake pads last. Furthermore, if you keep driving in mountainous areas where you need constant braking, it will quickly wear off the brake pads.
Moreover, the brake pad lining materials like organics tend to wear faster, leading to immediate replacement. Metallics, on the other hand, heavy wear on the rotors. Ceramics are the best, but they tend to cost more. If you feel the smooth, shiny, glazed surface of the brake pads, it’s high time to change the brake pads ASAP.
If the friction material gets too thin, it won’t slow down the vehicle immediately, and if the material is wholly dissipated, brakes will fail. When the brake pads get down to 3mm, it’s best to replace them immediately. While with some vehicles, you can also get along with 2mm brake pads. It’s the time where your brake system’s metal indicator is exposed, leading to a squealing sound around the disc.
Bear in mind that the lower the brake material thickness, the worse it is for the brake pads to deal with friction and heat. Therefore, as soon as the brake material is between 3-4 mm, it’s best to brake pad replacement. You can get away till the brake material thickness is around 2mm, but beyond this point, the brake pads’ performance will suffer and lead to a damaging effect on the brake rotors.
Is It OK To Replace Your Brake Pads?
Yes, it’s definitely OK to replace brake pads if you experience the signs mentioned above. And you must avoid any delays while you plan to replace your brake pads. Do not delay brake replacement for weeks or months as soon as the signs start appearing. It’s essential to consider brakes working in the right condition as the top-notch priority as if you do not maintain them; they can be life-threatening.
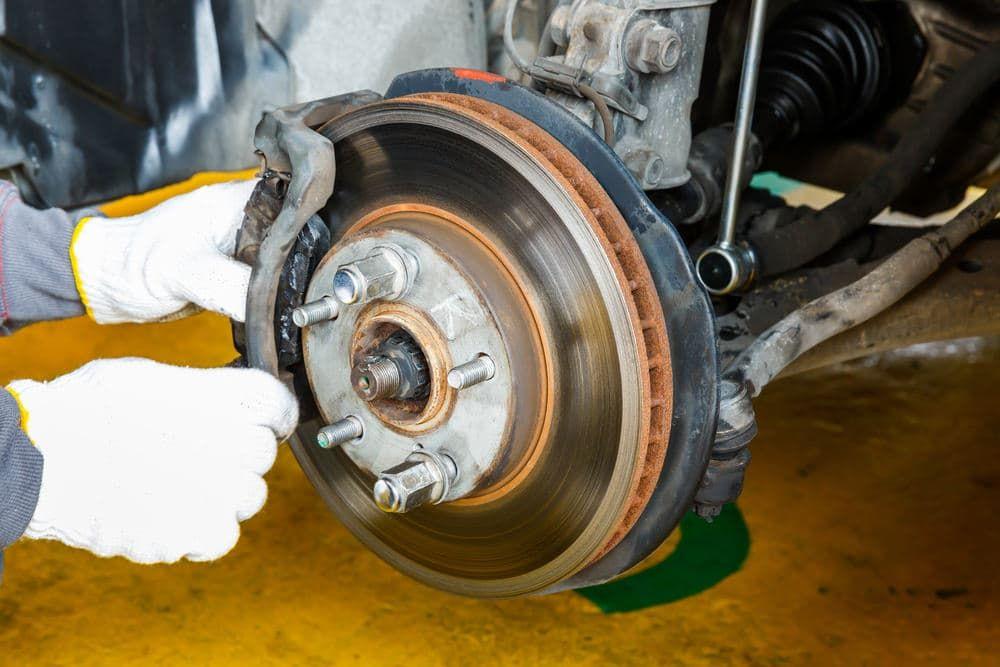
Pay close attention to the brake pads as avoiding them might cost you big repair bills, accidents, life-threatening incidents, and much more. If you feel professional and assume you can replace the brake pads yourself, check out the step-by-step guide:
Things Required:
- Box-end wrench
- Brake fluid
- Fluid holder and tubing
- Check your manufacturer’s manual to see the type of brake fluid.
- Jack up the vehicle to a level above solid ground and support it using four jack stands.
- Locate the four caliper bleeding screws and lose them gently. Once loosen, snug each one back to prevent air bubbles from entering the brake system.
- Now inspect the fluid level in the brake cylinder reservoir. Add fluid if it’s lower than the marked line. Bleed each brake correctly.
- Now fit one end of clear tubing at the bleeder screw and the other in the catch container to ensure air does not sneak in.
- Please switch off the car engine and ask a helper to hold the steering wheel and pump the brake pedal for multiple strokes till they feel solid. Once you achieve a firm pedal, then stop.
- Ask the helper to maintain pressure on the brake pedal, and you open the bleeder screw slowly till the fluid passes the clear tube.
- Once the pedal is about to reach the floor, stop and check the master cylinder fluid level reservoir.
- Repeat until you achieve clear fluid in tubing and repeat steps for other brake locations in each sequence.
- Once you complete all the brakes, apply for full pressure and release.
- Double-check and tightly fix the bleeder screws.
Conclusion:
If you experience any such symptoms, call the expert brake techs so they can immediately diagnose. Call the brake repair technicians now to get the top-rated, competitive prices for brake auto repair services. Are you experiencing any brake issues? Don’t delay further and go for replacing brake pads.