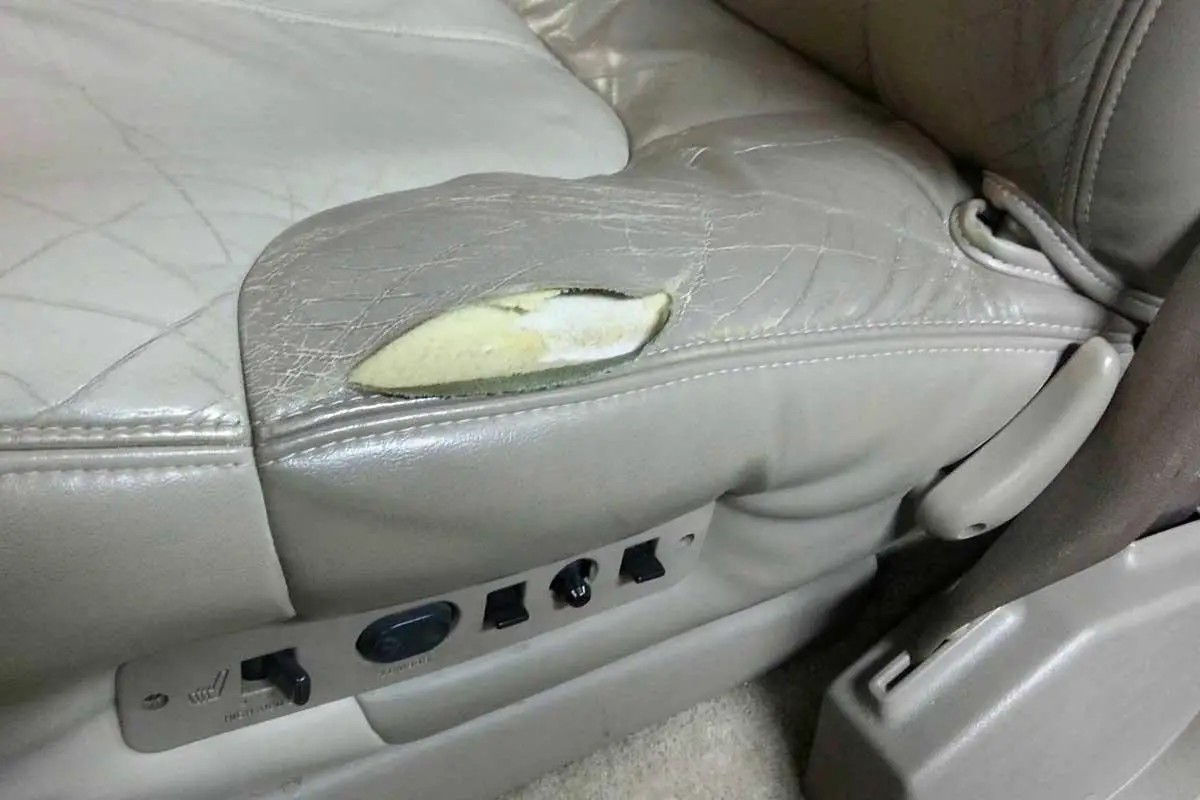
Are you worried about a large tear in your leather car seat and how to repair it? There are simple tips and tricks which allow you to mend the car seat yourself. Fix the small tears with the help of a leather repair kit. You will achieve a new finish of the seats using liquid leather or use a patch for fixing holes and hide the large tears with leather repair techniques.
Tears in leather seats are the common issues that we suffer from either due to some sharp objects, scratches by the dogs, cats, children, and much more. No matter how you suffered from a tear in leather car seats, you can smoothly perform repair while enhancing durability.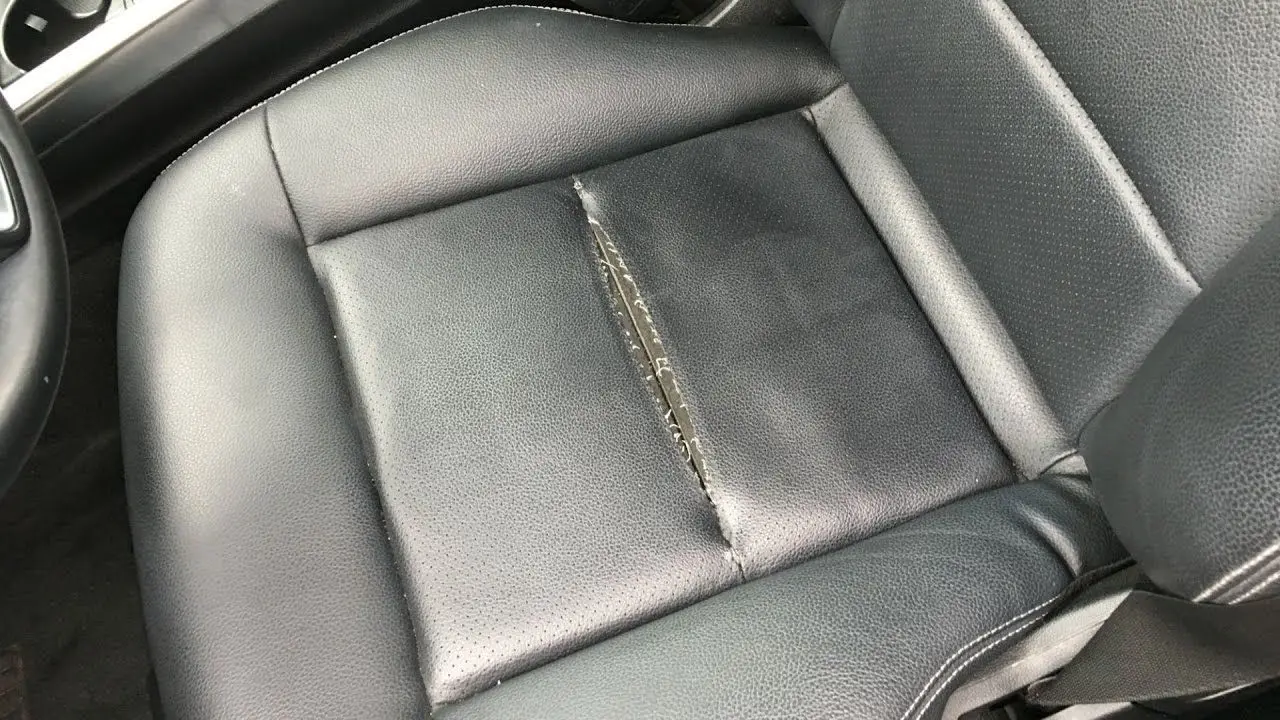
Four Ways Of Leather Car Seat Repair:
There are four different ways of car seat repair, which are as follows:
Use Car Seat Repair Kit For Fixing Tears:
Materials Required
Leather car seat repair kit, clean cloth, scissors, mild dish soap, fine-grit sanding paper/ block, water, and leather sealant.
Buy A Leather Repair Kit
Get your hands on the leather repair kit, which has colorant and matches well with your leather car seat; what’s more! You can grab a repair kit manufactured by your own car company and achieve the best results. On the other hand, you can opt for several other leather repair kits available on the market, so you can choose any.
Cleaning Leather Seats With Soap And Water Solution
Next, clean the leather car seat using mild soap and clean damp rags for wiping off the leather. Remove all the dust, crumbs, dirt, or grime by scrubbing the car seats gently.
Let It Dry
Now, let your leather car seat dry completely. Next, proceed to trim. Trim the edges around leather tears. If the tear edges curl outwards with threads hanging out, utilize scissors for cutting them.
Glue It Correctly
The next step is gluing the canvas with the cloth under the tear. Now slip the backing fabric within the hole and slide underneath the tear. Add some glue over the tear edges, so the material sticks firmly. Now, wait and allow the glue to dry completely.
Build Layers With Leather Filler
Start building layers with leather filler. Make use of a palette knife for spreading leather filler over the backing fabric in between tear edges. Slowly proceed with each layering and allow it to dry. Keep building the filler till it overlaps with the leather car seat.
Sanding
Sand the top layer using a sanding block and stop building the layers when the filler is in close association with the leather. Avoid sanding too much of the surrounding leather.
Wipe Off And Let It Dry
Wipe the leather car seat using a damp cloth. Using a damp cloth helps remove all debris and dust, which is leftover on the seats after the sanding process. Now, let the leather car seats dry before proceeding to the next step.
Add A Matched Colorant To Filler
Add colorant to your fillers. Make use of clean cloth to rub your desired color over the area of applied filler. Build several layers till it seems perfect and allow it to dry thoroughly. Once the colorant matches the leather car seat, stop proceeding.
Use A Leather Sealant To Cover The Torn Area
The last step is to cover the torn leather area using a leather sealant. Use a clean cloth to add leather sealant to the repairing car seat area. This prevents colorant from fading on the torn leather. Allow the adhesive to dry completely before you sit on the car seats.
For a further tutorial, you can watch the video and learn how to fix the ripped car seat.

Refinish Car Seat Repair Using Liquid Leather:
Materials Required
- Leather cleaner
- Sponge/ cloth
- 50% isopropyl alcohol
- Liquid leather
Buy Liquid Leather Car Seat Repair
Choose the liquid leather car seat repair that matches well with your leather car seat. You can also send the leather’s extra swatch to the leather distributor and get hands-on with the exact match. You can also send the color name or color code to your car distributor or leather distributor company to ensure you get the best matching shade.
Liquid leather comprises adhesive compound and combination filler available online and in upholstery/ auto parts store.
Before applying on the torn area, it’s better to apply on the inconspicuous spot. You can make adjustments to the color using a toner.
Cleaning The Car Seats
Now, clean the leather car seat thoroughly using a rag or soft cloth to get rid of all the crumbs, dirt, and debris. Wipe off the seats thoroughly with a leather cleaner. Now put some mild solvent such as 50% isopropyl alcohol over a clean rag, which helps you wipe the seats and remove all residues. Let the car seats dry immediately.
Dilute The Solution And Repair The Cracks
Apply a diluted liquid leather car seat repair solution using a sponge over the torn areas. Add some water to the liquid leather to dilute it using a 30% ratio before you rub increases and cracks. Use a damp cloth to wipe the car seats and remove the product from the cracks. Allow the liquid leather to dry, and apply the next coat for strengthening the color and buildup the cracks.
Next, use a full-strength coating over the entire seat. As soon as the torn areas dry up, apply an even layer of liquid leather over car seats to achieve the same colors.
Let It Dry
Condition the car seat leather once it dries. As soon as the liquid leather is dry, condition it to prevent the car seat from cracking in the future. Use a soft cloth to apply the leather conditioner and keep your fingers safe. Don’t sit until the car seat completely dries off.
Watch the video now to perform car seat repair efficiently. https://www.youtube.com/watch?v=-uM1wCUGqvM
Repair Leather Car Seat Using A Patch:
Materials Required
- Leather patch
- Leather adhesive
- Wax paper
- Scissors
Choose A Patch
Select a patch that matches well with your car seat. Choose the leather patch which fits well with your seats. You can also get hands-on with the leather piece, which has a similar texture. And then dye it to match well with the upholstery.
Cut The Patch
Cut down the patch to match the size of the torn area. Choose a slightly larger patch than the tear, so it attaches well, covering the damaged area. Use sharp scissors and cut down the patch along with the edges neatly while protecting the fingers.
Add Wax Paper Under The Torn Area
Next, add the wax paper underneath the tear. This wax paper is added to prevent the glue from hardening foam inside the car seat. Slip the wax paper in on one side and push the next side from the hole behind the car seat leather.
Adhere Using Leather Adhesive
Adhere the patch using leather adhesive and keep your fingers aside. Add leather adhesive to the patch edges. Now, carefully press the leather patch over the tear or hole and make sure it bonds well with your car seats.
Let It Dry
Let the adhesive dry off completely. Look at the instructions to assure it cures well. Let the adhesive dry entirely from the damaged area to use the car seats.
Alternative Way:
Materials Required
- Thread
- Needle
- Vinyl repair
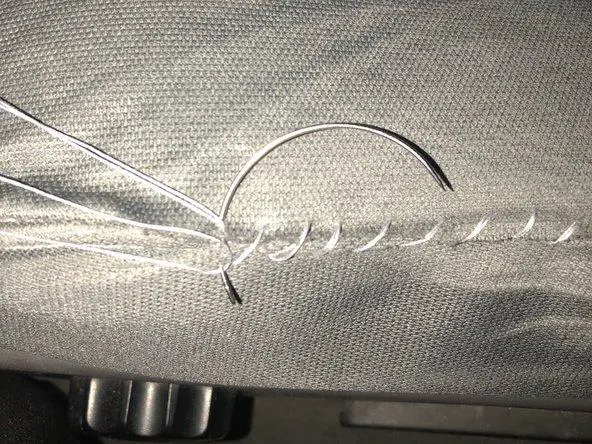
Stitch The Excess Leather
For this, you need enough leather around the rips so you can quickly fix the damaged area. To perform this leather car seat repair method, you must know how to stitch. You can also have a look at some YouTube videos to better understand how to repair the car seats.
Tips & Tricks To Prevent Further Damage To The Leather Car Seat:
Use Sunshade:
Direct sunlight on your car interior can crack or fade the leather seats. Choose an expandable sunshade for your windshield that protects the leather from heat or harsh lights. If you park the car for an extended duration in the sun, use a sunshade.
Regular Leather Conditioning:
Ensure to condition the leather car seats regularly. If the leather car seat dries off, it might tear or crack. Clean the car seats with leather conditioner after every six months. Make use of soft cloth and apply the leather conditioner in circular motions.
Prevent them against any damage and avoid any cracks or scratches. You can prevent leather damage by taking help from leather magicians who can fix the car tears and recondition the leather seat.
Don’t Place Any Sharp Objects:
Avoid placing a sharp object on the leather seat as it can result in leather damage. Avoid placing sharp knives, tools, or keys, which can cause tears. Take care of your car seats and always remove all the sharp objects from your pockets before sitting in the car to prevent any leather damage.
Conclusion:
Our top pick is to opt for adhesive or a leather patch to repair the large tears faced in leather car seats efficiently. We have discussed four different processes to quickly get rid of the cracks and torn areas.
I hope this detailed guide with video links and pictures enables you to understand the entire process. If you are new to repairing the car seats and have never tried fixing your car seat’s rips, you can practice first and then start. We are sure you’ll ace this task.
Repairing the car seat is not only about enhancing the look of the car seats, but restoring on time can also improve the longevity of your car seats. Fix the torn area efficiently so it won’t cost you much. Be patient and perform this daunting task efficiently while taking enough time. Be careful and pay attention when repairing the leather seats. Have fun!
